Friday, 30 March 2012

SIMPLE CHAINED LIST DEMO IN JSF2

SIMPLE CHAINED LIST DEMO IN JSF2


   Today, I developed a simple lesson for chained list. I am  having combo1 showing the names of two states (tamilnad and kerala).
The user selects the desired state from the combo and clicks button1. The important cities from that state are displayed in list1.
This is the first step for ajaxified example to be developed. The facelet code is given below.
  I always preferred to name the facelet file as view.xhtml.


//view.xhtml

<html xmlns="http://www.w3.org/1999/xhtml"
xmlns:f="http://java.sun.com/jsf/core"
xmlns:h="http://java.sun.com/jsf/html">


<body bgcolor="green" text="cyan">

<h:form>

SELECT THE STATE, YOU  WILL GET THE CITIES.<br/>

        <h:selectOneMenu  id="list1"  value="#{cityguide.state}">


          <f:selectItem  itemLabel="tamilnad" itemValue="tamilnad"/>
          <f:selectItem  itemLabel="kerala" itemValue="kerala"/>

       </h:selectOneMenu>
<h:commandButton   id='button1'  value="show cities"
          action="#{cityguide.show}"  />


 <h:selectOneListbox value="#{cityguide.city}" id="list2">

        <f:selectItems value="#{cityguide.cities}"/>
 </h:selectOneListbox>


</h:form>

</body>

</html>


************************************

cityguide.java is the corresponding backing bean. as given below,


//cityguide.java


package  mypack;


import javax.faces.bean.ManagedBean;
import javax.faces.bean.*;
import javax.faces.event.*;
import  java.util.*;
@ManagedBean(name="cityguide")
@SessionScoped


public class cityguide   implements  java.io.Serializable
{
String    state;
String    city;
Vector    cities;


        public  void    setState(String   a){state=a;}
        public  String  getState()      {return state;}


        public  void    setCity(String   a){city=a;}
        public  String  getCity()      {return city;}


        public  void    setCities(Vector   v){cities=v;}
        public  Vector  getCities() { return  cities;}


        //--------------------------------------


        public  String   show()
         {
          String   a = getState();


          Vector   vector1 = new Vector();


          if(a.equals("tamilnad"))
          {
             vector1.removeAllElements();
             vector1.add("Chennai");
             vector1.add("trichy");
             vector1.add("kovai");
             vector1.add("madurai");
          }


          if(a.equals("kerala"))
          {
             vector1.removeAllElements();
             vector1.add("quilon");
             vector1.add("kochin");
             vector1.add("trivandrum");
             vector1.add(" trissur");
          }
          System.out.println(""+vector1);
          setCities(vector1);
          return  "";


       }                       
 }


       Then type the url as below
"http://localhost:8080/jsf2chainedapp/view.jsf"


 In the next post I will use AJAX for the same purpose. This example gives dynamic loading of listbox. There is no iteration code. I have simply bound a collection to list1.


Thursday, 29 March 2012

JSF 1.1 CLIENT (TOMCAT5) FOR AXIS 1.1 DROP IN DEPLOYMENT WEBSERVICE

JSF 1.1 CLIENT (TOMCAT5)  FOR AXIS 1.1 DROP IN DEPLOYMENT WEBSERVICE


    Today, I developed a simple XML webservice by Drop in deployment method using axis 1.1.  This method is the easiest method to create webservice. All that we have to do is  to create a simple functionbean. We need not even compile it. Just place that java file in axis folder in tomcat5\webapps the current version of axis is AXIS2, but i am using AXIS1.1. Actually, I wanted to try connecting to the service from JSF 2. But JSF2 does not work in tomcat5. And axis does not work in tomcat6. Therefore I decided to try that in tomcat5. Both AXIS 1.1 and JSF1.1 will work in tomcat5. My function bean is named tourguide.java . I placed this file in tomcat5 webapps\axis as tourguide.jws.


     I started tomcat5. In the browser I typed  the URL as
  "http://localhost:8080/axis/tourguide.jws?wsdl"
         I found that wsdl was available.
----------------------------------------------------------------------
//tourguide.java
  
import java.util.*;


public   class tourguide
{
    public    String    showcities(String   s)
    {
       Vector    vector1 = new Vector();


       if(s.equals("kerala"))
       {
          vector1.addElement("quilon");
          vector1.addElement("tvm");
          vector1.addElement("cochin");
          vector1.addElement("kottayam");
       }


       if(s.equals("tamilnad"))
       {
         vector1.addElement("madurai");
         vector1.addElement("trichy");
         vector1.addElement("kovai");
         vector1.addElement("chennai");
       }


       if(s.equals("karnataka"))
       {
         vector1.addElement("bangalore");
         vector1.addElement("mangalore");
         vector1.addElement("mysore");
         vector1.addElement("hubli");
       }


          int   n = vector1.size();


          String   r = "";


          for( int j=0; j<n; j++)
          {
           String   v = (String)  vector1.elementAt(j);
           r = r+v+"\n";
          }


          return   r;
     }
}
**********************************************************************
  Then I created a java client program for the above webservice as shown below.

//tourjwsclient.java

import java.net.*;
import java.util.*;
import javax.xml.rpc.ParameterMode;
import org.apache.axis.client.Service;
import org.apache.axis.client.Call;
import org.apache.axis.encoding.XMLType;

public class    tourjwsclient
{


   public static void main(String args[])
   {
     try
     {                      
     System.out.println("Start");
     String s1="showcities";

     Service     service =   new Service();
     System.out.println("Service ready");


     Call    call   =   (Call)   service.createCall();
     System.out.println("call ready");

     URL      url   =
           new URL("http://localhost:8080/axis/tourguide.jws");

     call.setTargetEndpointAddress(url);

     call.setOperationName(s1);
     call.addParameter("name",XMLType.XSD_STRING,ParameterMode.IN);
     call.setReturnType(XMLType.XSD_STRING);

     String   r = args[0];

  //   String s2=(String)call.invoke(new Object[]{r});  // important!

     String    vector  = (String)call.invoke(new Object[]{r});   
     System.out.println(vector);                   

     }catch(Exception e){System.out.println(""+e);}

   }

}
***********************************************
To compile this, I placed  the following jar files in classpath.

set CLASSPATH=g:\axisnew;

              e:\axis11\lib\axis.jar;

              e:\axis11\lib\commons-discovery.jar;

              e:\axis11\lib\commons-logging.jar;

              e:\axis11\lib\jaxrpc.jar;

              e:\axis11\lib\saaj.jar;

              e:\axis11\lib\log4j-1.2.8.jar;

              e:\axis11\lib\xercesImpl.jar
**************************************************

   Now, I compiled it successfully. In the above program note the URL . We have already started tomcat5. Therefore webservice is available. We can connect to this webservice from our console program. My working folder is G:\axisnew.

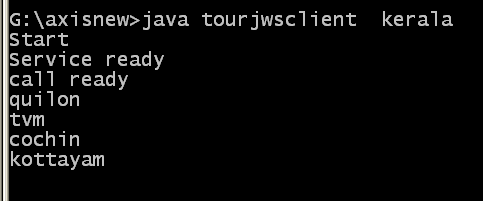
g:\axisnew>java  tourjwsclient  kerala

       I  got the following result.

**********************************************
 Now, I converted this main program into a functionbean(helper class). I named it as tourjwshelper.java  shown below.
(As I am going to use it in jsf backing bean, I added the package statement)

//    tourjwshelper.java
package  mypack;

import java.net.*;
import java.util.*;
import javax.xml.rpc.ParameterMode;
import org.apache.axis.client.Service;
import org.apache.axis.client.Call;
import org.apache.axis.encoding.XMLType;

public class    tourjwshelper
{


   public   String    getcities(String s)
   {

        String   v="";


     try
     {                      
     System.out.println("Start");
     String s1="showcities";

     Service     service =   new Service();
     System.out.println("Service ready");


     Call    call   =   (Call)   service.createCall();
     System.out.println("call ready");

     URL      url   =
           new URL("http://localhost:8080/axis/tourguide.jws");

     call.setTargetEndpointAddress(url);

     call.setOperationName(s1);
     call.addParameter("name",XMLType.XSD_STRING,ParameterMode.IN);
     call.setReturnType(XMLType.XSD_STRING);

     String   r = s;

  //   String s2=(String)call.invoke(new Object[]{r});  // important!

         v  = (String)call.invoke(new Object[]{r});   


     }catch(Exception e){System.out.println(""+e);}

          return   v;

   }

}
**************************************
 Now I create two files for jsf 1.1 (input.jsp and backer.java).

input.jsp
----------
<!DOCTYPE HTML PUBLIC
"-//W3C//DTD HTML 4.01 Transitional//EN">

 <%@ taglib uri="http://java.sun.com/jsf/html" prefix="h" %>

 <%@ taglib uri="http://java.sun.com/jsf/core" prefix="f" %>

 <f:view>
 <html>
 <body          bgcolor="cyan">
   <h:form id="form1" >

       <h:selectOneMenu  id="operation"  value="#{backer.state}">

          <f:selectItem  itemLabel="kerala" itemValue="kerala"/>
          <f:selectItem  itemLabel="tamilnad" itemValue="tamilnad"/>
          <f:selectItem  itemLabel="karnataka" itemValue="karnataka"/>


       </h:selectOneMenu>


       <h:commandButton   id="button1"
                          action="#{backer.show}"
                          value="show" />

  <h:inputTextarea rows="20" cols="40" id="text4"  value="#{backer.result}" />

   </h:form>
  </body>
  </html>
 </f:view>
**********************************************
  I created a new context in tomcat5 webapps as axistourjsfapp.
I placed the above jsp file in the root of this context. i created WEB-INF under the root. Placed web.xml and faces-config.xml inside WEB-INF

web.xml
----------
<?xml version='1.0' encoding='UTF-8'?>

<!DOCTYPE web-app PUBLIC
  "-//Sun Microsystems, Inc.//DTD Web Application 2.3//EN"
  "http://java.sun.com/dtd/web-app_2_3.dtd">

<web-app>

    <context-param>
     <param-name>javax.faces.STATE_SAVING_METHOD</param-name>
      <param-value>client</param-value>
    </context-param>

    <context-param>
    <param-name>com.sun.faces.validateXml
    </param-name>
    <param-value>true</param-value>

    </context-param>

    <context-param>
        <param-name>com.sun.faces.verifyObjects</param-name>
        <param-value>true</param-value>

    </context-param>

    <!-- Faces Servlet -->
    <servlet>
  <servlet-name>Faces Servlet </servlet-name>
   <servlet-class>javax.faces.webapp.FacesServlet
   </servlet-class>

   <load-on-startup> 1 </load-on-startup>
    </servlet>


    <!-- Faces Servlet Mapping -->
    <servlet-mapping>
    <servlet-name>Faces Servlet</servlet-name>
     <url-pattern>/faces/*</url-pattern>
    </servlet-mapping>


</web-app>
*******************************************
faces-config.xml
------------------------
<?xml version='1.0' encoding='UTF-8'?>

<!DOCTYPE faces-config PUBLIC
  "-//Sun Microsystems, Inc.//DTD JavaServer Faces Config 1.1//EN"
  "http://java.sun.com/dtd/web-facesconfig_1_1.dtd">

<faces-config>

  <application>
    <locale-config>
      <default-locale>en</default-locale>

    </locale-config>
  </application>

      <managed-bean>

         <managed-bean-name>backer</managed-bean-name>

         <managed-bean-class>mypack.backer
        </managed-bean-class>
         <managed-bean-scope>session</managed-bean-scope>
             </managed-bean>

    </faces-config>
****************************************

Now I created classes folder and lib folder under WEB-INF. I created mypack folder under classes folder. I placed the tourjwshelper.class in mypack folder. I placed the following jar files in lib folder

Now comes the code for backing bean

//backer.java
package  mypack;

import javax.faces.context.*;
import javax.faces.component.*;
import javax.faces.validator.*;


public class backer
{
String     result;

String    state;


 public   void    setState(String a)   { state=a;}

 public   void    setResult(String a)   { result=a;}


 public   String  getState()   { return   state; }

 public   String  getResult()   { return   result; }

   public   void   show()
   {
        tourjwshelper   bean1  =  new tourjwshelper();
        String r=bean1.getcities(state);

        setResult(r);
   }
}
**********************************************
shutdown tomcat5 because we have  made changes in WEB-INF
and restart. I typed the URL as 
  "http://localhost:8080/axistourjsfapp/faces/input.jsp"

I selected 'tamilnad' from the combo and clicked show  button. I got the result in area1. Therefore, I am now happy that I am able to connect to a web service from my JSF1.1 program.
    I will have to try to get similar result in JSF2.
***************************************
 Web service is slow. So i did not get result for some time. And then I got it.


Wednesday, 28 March 2012

SOME SIMPLE EXAMPLES FOR BUILT-IN AJAX IN JSF2

SOME SIMPLE EXAMPLES FOR
BUILT-IN AJAX IN JSF2
==========================

  Let us consider the following  ajaxtime.xhtml

<?xml version="1.0" encoding="UTF-8"?>
<!DOCTYPE html PUBLIC "-//W3C//DTD XHTML 1.0 Transitional//EN"
"http://www.w3.org/TR/xhtml1/DTD/xhtml1-transitional.dtd">

<html xmlns="http://www.w3.org/1999/xhtml"
      xmlns:f="http://java.sun.com/jsf/core"     
      xmlns:h="http://java.sun.com/jsf/html">

<h:body>
<f:view>
<h:form>
   
    <h:commandButton         id='button1'    value="show time" >
                   <f:ajax            render="label1"/>
    </h:commandButton>


    <h:outputText value="#{timedisplayer.time}"       id="label1"/>


    <br/>

    <h:commandButton         id='button2'       value="greet" >
      <f:ajax            render="label2"/>
    </h:commandButton>


    <h:outputText value="#{timedisplayer.greeting}"     id="label2"/>


</h:form>
</f:view>
 </h:body>
</html>
----------------------------------------------------------------------------------------
   Carefully note the <f:ajax   tag.

What this page means will become clear when we see the code for
//   timedisplayer.java 

package   mypack;
import  java.util.*;
import java.io.Serializable;
import javax.faces.bean.ManagedBean;
import javax.faces.bean.SessionScoped;

@ManagedBean(name="timedisplayer")
@SessionScoped

public class timedisplayer
{
int   n;

   public Date   getTime ()
   {
      return (new Date());
   }

   public  String getGreeting()
   {
      String   greeting;
      n = n+1;
     
      if(n%2==1) { greeting="hello";}
      else     { greeting="welcome!";}

      return  greeting;
   }
}
===============================
  Let us now explain.
When  button1 is clicked, ajax call is made to
the backing bean named 'timedisplayer'.
'render' means that label1 is to be updated by the
result of ajax call . ( label1 is bound to 'time' ).
Where is the 'time' attribute? Not necessary.
When we provide getXXX  , it automatically means that.
--
Coming to button2, ajax call is made to timedisplayer.
and label2 is bound to greeting property.

The syntax is a bit confusing but the result is fine!
=====================================
   Anyway, 'clicking'  buttons , is NOT the ideal demo for ajax.
So, I will try to develop a demo which uses 'mouseover'.or similar action.


DEMO FOR BUILT-IN AJAX SUPPORT IN JSF-2

    Just now I did a successful demo for built-in ajax support in jsf-2.
A simple tag <f:ajax> does the trick.
 The main point to be noted is the change in the JSF view page.


<?xml version="1.0" encoding="UTF-8"?>
<!DOCTYPE html PUBLIC "-//W3C//DTD XHTML 1.0 Transitional//EN" 
"http://www.w3.org/TR/xhtml1/DTD/xhtml1-transitional.dtd">


<html
       xmlns="http://www.w3.org/1999/xhtml"
      xmlns:f="http://java.sun.com/jsf/core"      
      xmlns:h="http://java.sun.com/jsf/html" >

 <h:body>

  <f:view>
     <h:form  id="form1">

      <h:inputText    id="text1"                            value="#{backing.name}" /><br/>

    <h:commandButton   id="button1"   value="echo">
            <f:ajax   execute="text1"  render="text2"/>
    </h:commandButton>

     <h:outputText  id="text2" value="#{backing.result}" />


     </h:form>
</f:view>

    </h:body>
</html>
***********************************************
The model is as usual


package mypack;

import java.io.Serializable;
import javax.faces.bean.ManagedBean;
import javax.faces.bean.SessionScoped;
import javax.faces.event.*;


@ManagedBean(name="backing")
@SessionScoped


public class backing implements  Serializable
{


String  name=null;
String result;


       public void setName(String a){   name=a;  }
       public void setResult(String a){result=a;}


        public  String getName(){return name;}
        public  String getResult()
        {


        echobean    bean1=new  echobean();
        result  =  bean1.echothis(name);
              
         return  result;
        
       }


     //------------------------------------------


}
****************************************
The  helper class echobean is given below


package  mypack;


public  class  echobean
{
  public  String  echothis(String a)
  {


    return "echo  is       "+ a;
  
  }
}

***************************************
Explanation for the JSF code.
Carefully note that <f:ajax> tag occurs inside command button tags.

 <h:commandButton   id="button1"   value="echo">
            <f:ajax   execute="text1"  render="text2"/>
    </h:commandButton>

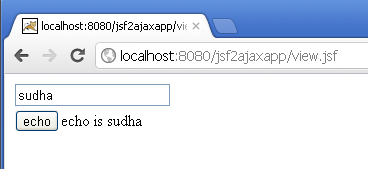
Screen shots follow
BEFORE AJAX CALL


Tuesday, 27 March 2012

A SIMPLE DEMO FOR CRUD OPERATIONS IN JSF-2(USING ANNOTATION)

A SIMPLE DEMO FOR CRUD OPERATIONS IN  
    JSF-2(USING ANNOTATION)
**************************************
  In all my experiments, I make use for editorbean which has just one function named ‘edit’. My sample Database table has just three fields (id, name, place). I give five parameters for edit function(id, name, place, operation and query). Many authors give showall method. I think, It is not desirable in real life, because there may be many thousands of records. So, it is always good practice to limit the number of records returned by the query. That is why I always provide parameter as query. Of course, the user can put the query as “select * from table1” to get all records if he wants. The operation parameter can take values like add, modify, find remove and query(as verb).

  Therefore our GUI design is very simple. It will provide ‘text1’, ’text2’, ‘text3’, ‘text4’ for query and a combo for operations. The only difference is we are using JSF tags.

  I give the jsp file here.


index.jsp
*********
<%@ page  language="java"%>
<%@  taglib  uri="http://java.sun.com/jsf/html"  prefix="h"%>
<%@  taglib  uri="http://java.sun.com/jsf/core"  prefix="f"%>

<html>
<body   bgcolor="green"    text="cyan">
<center>
  <f:view>
        <h:form  id="myform">
      <table border="1">
      <tr>
       <td><h:inputText id="text1"
           value="#{crudbacking.id}" />
       </td>

       <td>  <h:outputText 
              value="ID:"/>  
       </td>

       </tr>
    
       <tr>

        <td>
         <h:inputText id="text2"
           value="#{crudbacking.name}"   />
        </td>
        <td><h:outputText  value="NAME:"/>           
        </td>

       </tr>


     <tr>
      <td><h:inputText id="text3"
          value="#{crudbacking.place}"   />
      </td>
      <td> <h:outputText   value="PLACE:"/>     
      </td>
    </tr>

    <tr>
     <td><h:inputText id="text4"
         value="#{crudbacking.sql}"   />
     </td>
     <td> <h:outputText  value="Query:"/>
     </td>
   </tr>


   <tr>
     <td>
  <h:selectOneMenu  id="operation" 
       value="#{crudbacking.operation}">

      <f:selectItem  itemLabel="add"  
                     itemValue="add"/>              
      <f:selectItem  itemLabel="find"   
                    itemValue="find"/>
      <f:selectItem  itemLabel="modify"
                    itemValue="modify"/>
      <f:selectItem  itemLabel="delete"
                    itemValue="delete"/>
      <f:selectItem  itemLabel="query"
                     itemValue="query"/>

   </h:selectOneMenu>
 </td>
  <td>
    <h:commandButton   id="button1"
         action="#{crudbacking.dooperation}"
         value="submit" />

  </td>
 </tr>
</table>


<h:dataTable value="#{crudbacking.players}"
             var="ob">
    <h:column>
         <h:outputText  value="#{ob.id}"/>
    </h:column>

    <h:column>
       <h:outputText  value="#{ob.name}"/>
   </h:column>

   <h:column>
      <h:outputText  value="#{ob.place}"/>
   </h:column>
   </h:dataTable>
    </h:form>
   </f:view>
  </center> 
 </body>
</html>
Note: dataTable control is very  special. I am not using any iteration code like
foreach as in jstl. But I just mention the value as the Vector (players). We get all the rows. From the above code itself, It is clear that my backing bean is named backing. I give the code below.

package mypack;

import java.io.Serializable;
import javax.faces.bean.ManagedBean;
import javax.faces.bean.SessionScoped;
import javax.faces.event.*;
import java.util.*;

@ManagedBean(name="crudbacking")
@SessionScoped

public class backing    implements  Serializable
{

 Vector players;
 String operation;
 String  id;
 String  name;
 String place;
 String sql;
    public void setId(String a){id=a;}
    public void setName(String a){name=a;}
    public void setPlace(String a){place=a;}
    public void setSql(String a){sql=a;}
    public void setOperation(String a) 
               {operation=a;}


  public  String getId(){return id;}
  public  String getName(){return name;}
  public  String getPlace(){return place;}
  public  String getSql(){return sql;}
  public  String getOperation()
                {return operation;}


  public  String   dooperation()
   {
       playerdao   bean1= new playerdao();
       players =
    bean1.edit(id,name,place,operation,sql);
    
    return  "success";

  }

  public Vector   getPlayers()
  {
   return players;
  }

}

  
playerdao
**********
package  mypack;

import java.sql.*;
import  java.util.*;

public   class  playerdao
{
 public Vector   edit(String a, String b,  
            String c, String d,String sql)
 {
       Vector    players=new  Vector();
       
  try
  {
Class.forName("sun.jdbc.odbc.JdbcOdbcDriver");
String     url="jdbc:odbc:contacts";
Connection connection =  
          DriverManager.getConnection(url);
Statement     statement =
          connection.createStatement();
//---------------------------------------------


       if(d.equals("add"))
       {
         sql="insert into table1   values('"+a+"', '"+b+"', '"+c+"')  ";
       }
       if(d.equals("find"))
       {
        sql="select * from table1 where key='"+a+"'    ";
       }


       if(d.equals("modify"))
       {
        sql="update table1 set table1.name='"+b+"', table1.place='"+c+"' where table1.key='"+a+"'    "   ;
       }


        if(d.equals("delete"))
        {
       sql="delete from table1 where key='"+a+"'   ";
        }

    //----------------------------------
        boolean   rsa =  
       statement.execute(sql);
       if(rsa==true)
      {
      ResultSet   rs =  
           statement.executeQuery(sql);
      while(rs.next())
      {
      player     player1 = new player();
      player1.setId(" "+rs.getString(1));
      player1.setName(" "+rs.getString(2));
      player1.setPlace(" "+rs.getString(3));
      //------------------------------------
      players.addElement   (player1);
       
           }
        }


        else
        {
            String r = "done!";
            player   player1=new player();
            player1.setName(r);
            player1.setId(" ");
            player1.setPlace(" ");
            players.addElement   (player1);
            connection.close();
        }

     }   catch(Exception  e1)
           {
            player   player1=new player();
            player1.setName(""+e1);
            player1.setId(" ");
            player1.setPlace(" ");
            players.addElement   (player1);

            }

     return   players;

    }

}
*******************************************
Compile playerdao and backing java source files and place them in mypack folder as usual. Index page in context root. No need for any special entry in web.xml and faces-config.xml

start tomcat7 and type the URL as