Sunday 26 February 2012

JPA DEMO IN CONSOLE PROGRAM


Today, I did a simple JPA program in console.
As usual , my database is MySql in XAMPP.
The database name is ‘jpadb1’ .

  Then I created a table ‘player’ which contains 3 fields. They are id, name and place.

    In this table, id is an auto increment field and, name and place  are  strings.

goto  c:\xampp\mysql\bin

   >mysql  -u  root
   >create  database  jpadb1;
   >use jpadb1;
   >create  table  player  (id  int(5) NOT NULL 
      primary key auto_increment, name  
      varchar(20),  place varchar(20));

Then I inserted some records  into player table.

Then I   opened  a new command prompt and  created a folder   in g:\   as ‘jpademo2’.
  In this folder, I am going to put three java files and a META-INF folder  for JPA  persistence xml mapping file. The java files I had created are,

        1.player.java
        2.querybean.java
        3.demo.java

Here player is a value bean which will hold record of the player table whenever  necessary.

import  javax.persistence.*;

@Entity
@Table(name="player")

public class  player
{
@Id
@GeneratedValue

  String  id;
  String  name;
  String  place;

  public  void    setId(String  s)       {id=s;}
  public  String  getId()          {return  id;}

 
  public  void    setName(String  s)   {name=s;}
  public  String  getName()      {return  name;}

  public  void    setPlace(String  s) {place=s;}
  public  String  getPlace()    {return  place;}


}

Here I used some annotations for mapping the player table to this entity bean class and I specified the database name, driver class in persistence.xml file. This xml file should be placed in META-INF folder.
So I create a folder under jpademo2 directory.

>md  META-INF
>cd   META-INF
>edit persistence.xml
<?xml  version="1.0" encoding="UTF-8"?>
<persistence>
<persistence-unit  name="jpa" 
 transaction-type="RESOURCE_LOCAL">

   <provider>
org.hibernate.ejb.HibernatePersistence
</provider>

   <class>player</class>

   <properties>

      <property  name="hibernate.connection.url"
                 value="jdbc:mysql://localhost/jpadb1" />

      <property  name="hibernate.dialect"
                 value="net.sf.hibernate.dialect.MySQLDialect"/>

      <property  name="hibernate.connection.driver_class"
                 value="com.mysql.jdbc.Driver" />

      <property  name="hibernate.connection.password"
                 value="" />

      <property  name="hibernate.connection.username"
                 value="root" />

      <property  name="hibernate.hbm2ddl.auto"
                 value="update" />

      <property  name="hibernate.show_sql"
                 value="true" />

    </properties>

  </persistence-unit>

</persistence>
*************************************************
Then I wrote the querybean.java  code. In which we have to do three things
             1.Create EntityManagerFactory object
             2.Create  an object for EntityManager using  
                EntityManagerFactory object
             3.Start the transaction with the help  of
                EntityManager   Object.

******************************************************

import   java.util.*;
import  javax.persistence.*;


@SuppressWarnings("serial")

public  class querybean
{

  EntityManager  em;
  player         player1;

  public  String  sqlquery

(String a,String  b,String  c,String d)
  {

    String  r="\n*****************************************\n\n";

    try
    {
     System.out.println("beginning");

       EntityManagerFactory   emf=
             Persistence.createEntityManagerFactory("jpa");

      System.out.println("entitymanagerfactory obtained");

       em   =   emf.createEntityManager();
       System.out.println("entity manager obtained");


       em.getTransaction().begin();
       System.out.println("transaction begun");

       System.out.println(">java demo  100 tom trichy find   (etc)" );

       if(d.equals("add"))
       {
         player1  =   new  player();

         player1.setName(b);
         player1.setPlace(c);
         em.persist(player1);
         r=r+"one  record  added!";

       }

       if(d.equals("update"))
       {

         player1  =  em.find(player.class,  a);

         player1.setName(b);
         player1.setPlace(c);

         em.merge(player1);
        r=r+"Updated!...";
       }

       if(d.equals("find"))
       {


         player1  =  em.find(player.class,a);

         String s1=player1.getName();
         String s2=player1.getPlace();

         r=r+a+"  "+s1+"  "+s2;
       }

       if(d.equals("delete"))
       {

         player1  =  em.find(player.class,a);
        
         String s1  =  player1.getName();
         String s2  =  player1.getPlace();

         em.remove(player1);

         r=r+" deleted!";
       }

       if(d.equals("show"))
       {

         Query   query=em.createQuery("SELECT p  FROM  player  p");
      
         List  list      =  query.getResultList();
         Iterator   it  =  list.iterator();

         while(it.hasNext())
          {
           player1   =   (player) it.next();


           String s3  =  player1.getId();
           String s1  =  player1.getName();
           String s2  =  player1.getPlace();

           r=r+s3+"  "+s1+"  "+s2+"\n";

          }
       }

       em.getTransaction().commit();
       em.close();

      
    }  catch(Exception e1){System.out.println(""+e1);}


   return  r;
  }

}


Finally, I created a console client for this bean. I have give the code below,

demo.java
//-----------
class  demo
{
  public static void main(String[] args)
  {
   String  a  =  args[0];                //id
   String  b  =  args[1];                //name
   String  c  =  args[2];                //place
   String  d  =  args[3];                //operation

   querybean   bean1  =  new   querybean();

   String  r  =  bean1.sqlquery(a,b,c,d);

   System.out.println(r);
  }
 
}


Now, we have to compile the above java files. Before that we should have some jar files which are necessary to write a jpa application in class path. The jar file are

 ant-1.6.5.jar
 ant-swing-1.6.5.jar
 antlr-2.7.6.jar
 asm.jar
 cglib-2.1.3.jar
 commons-collections-2.1.1.jar
 commons-logging-1.0.4.jar
 dom4j-1.6.1.jar
 ejb3-persistence.jar
 hibernate3.jar
 hibernate-annotations.jar
 hibernate-commons-annotations.jar
 hibernate-core.jar
 hibernate-entitymanager.jar
 javassist-3.3.ga.jar
 jdbc2_0-stdext.jar
 jta.jar
 log4j.jar
 mysql-connector-java-3.1.6-bin.jar
 persistence-api-1.0.jar
 lib\slf4j-api.jar
 slf4j-log4j12.jar
 xerces-2.6.2.jar;c:\jpajars\lib\xml-apis.jar
mysqldriver.jar


  Now we can compile the java files

>setpath
>setcpath

>javac   player.java

>javac  querybean.java

>javac   demo.java

Now we can run the demo.java as follows

>java  demo  “”   “sam”  “chennai”   “add”

then you will get  following messages


then go to your mysql prompt and query

“select *from  player” you will get the following table


Thursday 23 February 2012

BEGINNING STRUTS2

I began with struts2-blank.war  in the Struts distribution.
I placed this war file tomcat6  /webapps folder.
Then I started tomcat6.
( d:\tomcat6\bin>tomcat6)
--------
I expected the blank.war to be automatically expanded by tomcat.
So, I shutdown tomcat6.
( just ctrl+c)
---------
  Now, I explored tomcat6\webapps folder.
As expected, I found  struts2-blank FOLDER.
---
I copied this folder to the desktop.
Then, I renamed it as 'myapp'.
After renaming, I copied and pasted it in
tomcat6\webapps  folder.
---
I started tomcat6 again.
--
In the browser, I typed the URL as
'http://localhost:8080/myapp/

I got the following display.
( after some time 'loading')
----------------------------
Struts is up and running ...
Languages

    English
    Espanol
--------------------------
So, my context is working.

 I have a background in Struts1.1
So, I wanted to see where Struts2 differs in deployment.

The sample makes use of package 'example';.
As usual, web.xml is directly under WEB-INF

But, they have placed struts.xml  inside classes folder.
This is important.

Also, I found  two xml files inside the classes folder.

One file has been given name as 'struts.xml'.
The other file has been named 'example.xml'
My package name is going to be 'mypack'.
I renamed 'example.xml' as 'myapp.xml'.

I renamed 'example'  folder as 'mypack'.
Then I removed all the  files already found there.

Now , I am ready!
===============
I am in g: drive

g:>md struts2example

g:>cd struts2example

  >md mypack
  >cd  mypack

 >edit  setpath.bat
set path=c:\windows\command;c:\jdk1.5\bin

>edit  setcpath.bat

set  classpath=g:\struts2example;commons-logging-1.0.4.jar;ognl-2.6.11.jar;
xwork-2.0.7.jar;freemarker-2.3.8.jar;struts2-core-2.0.14.jar

( I found these jars in struts2-blank\WEB-INF\lib)

>edit  demoAction.java

package  mypack;

import com.opensymphony.xwork2.ActionSupport;

public class demoAction  extends 
                        ActionSupport
{
String     username=null;
String     password=null;

public void setUsername  (String  s)
          {username=s;}

 public String getUsername()
          {return   username;}

 public  void  setPassword(String s)
           {password=s;}
 public String getPassword()
                {return   password;}

 public  String  execute () 
              throws    Exception
 {
  String s1=  getUsername();
  String s2=  getPassword();

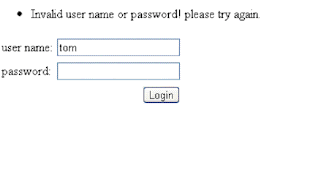
  if(!s1.equals("sam")||!s2.equals("admin"))
  {

  addActionError
("Invalid  user  name  or password! please try again.");
  return ERROR;
  }

  else
  {
  return SUCCESS;
  }
 }

}
============================================

>setpath
>setcpath
>javac demoAction.java


 copy the   class  file to  tomcat6\webapps\myapp\WEB-INF\classes\mypack  (as   usual)

>edit  demoInput.jsp

<%@ taglib  prefix="s"  uri="/struts-tags"%>
<html>
 <body>

  <s:form  namespace="/mypack"  action="demoAction"  method="POST">
    <s:actionerror />
    <s:fielderror  />

    <s:textfield   name="username" 
                   label="user name" />

    <s:password   name="password" 
                  label="password" />

    <s:submit  value="Login" />

  </s:form>

 </body>

</html>

-----------------------------

>edit  demoOutput.jsp

<%@  taglib  prefix="s" 
             uri="/struts-tags"  %>

<html>

  <body>

    Welcome... 
    <s:property     value="username"  />

  </body>

</html>

-------------------------------------

open a new command  then go to

d:\tomcat6\webapps\myapp\WEB-INF\classes 

rename example.xml   as 'myapp.xml'

then  edit that file as follows

<?xml version="1.0" encoding="UTF-8" ?>
<!DOCTYPE struts PUBLIC
        "-//Apache Software Foundation//DTD Struts Configuration 2.0//EN"
        "http://struts.apache.org/dtds/struts-2.0.dtd">

<struts>

    <package name="mypack"   
         namespace="/mypack"
         extends="struts-default">

        <action name="demoAction"
                class="mypack.demoAction">

     <result>/demoOutput.jsp</result>
   <result name="error">/demoInput.jsp
     </result>
        </action>

    </package>
</struts>

then  goto  struts.xml  which is available  in same directory(classes)

>edit  struts.xml

<?xml version="1.0" encoding="UTF-8" ?>
<!DOCTYPE struts PUBLIC
    "-//Apache Software Foundation//DTD Struts Configuration 2.0//EN"
    "http://struts.apache.org/dtds/struts-2.0.dtd">

<struts>

    <constant name="struts.enable.DynamicMethodInvocation" value="false" />
    <constant name="struts.devMode" value="false" />

    <include file="myapp.xml"/>


</struts>


Now, I am ready to test the program.
I started tomcat6.
In the browser, I typed the address as


I got two textfields.
I typed ‘sam’ in text1 and ‘admin’ in text2 and submitted.

There was a slight delay and then I got output as welcome sam.

   Them I typed tom in text1 and ‘admin’ in text2 and submitted.


I think, this procedure is easy to execute and can be followed for advanced experiments.


Wednesday 22 February 2012

A SIMPLE HIBERNATE DEMO IN ECLIPSE IDE ( INDIGO.)..(3.7)

   
   Today, I created a simple demo for hibernate in Eclipse.
It is very simple. First of all, we have to include all the required 
jar files which are needed for developing a hibernate program.


  They are  available in hibernate2\lib  folder and add hibernate2\hibernate2.jar. also
In the same way you can include mysqldriver.jar file also.And my project name  is hiberconsoletrial.


  Before beginning hibernate code,


we have to  create a simple database in MySql. I am using MySql which comes bundled with XAMPP.


 Now go to c:\xampp\mysql\bin

>mysql   -u  root
>create   database   mycontacts;
>use mycontacts;
>create table  mycontactstable (id   varchar(4) primary key,name   varchar(15), phone  varchar(15));
After making a few entries,

   I  created a new class in hiberconsoletrial. It is a bean(besthiherbean).
and wrote a console class (besthiberbeanuser) in the same folder(hiberconsoletrial\src). Then place properties file and mapping xml file  in the same directory where our besthiberbean and besthiberbeanuser classes are available.

  Then I went to run configuration and gave required arguments.
It ran successfully!


.


SPRING DEMO FOR JDBC DAO ( Console)


note
====
     1)  set path=c:\windows\command;c:\jdk1.5\bin


     2)  set classpath=g:\springdemos\jdbc\mysqljdbc:
                       spring.jar;
                       commons-logging.jar;
                       mysqldriver.jar
        ( all the jar files have been placed in this folder)
     --------------------------------------------------------
     3)   I created a database in mysql ( xampp)
          named 'springcontacts'.
          I created a table ( table1)
          with key, name and place
          ( key assigned and String type)


        Created a few records.
        'select * from table1'
        I got expected readings.
        I left it running
     -------------------------------------------------------


     4)  I began with an interface  ( dbinter)
         I wrote an impementation   ( dbinterimpl)


         I created a configuration file in xml


         ( spring-config.xml)


     Then I wrote a console program ( demo)


     ------------------------------------------------------------
         setpath
         setcpath
         javac dbinter.java
         javac dbinterimpl.java
         ---
         java demo  "104"  "jacob"  "kanpur"  "add"
         ---
        I then checked up by a query in mysql window.
        I got correct result.


        This is an illustration for Spring DAO  support. (jdbc)
******************************************************
In my next blog, I will write about Hibernate through Spring in console.


In the third of the series, I will integrate JPA and Spring.

Tuesday 21 February 2012

MIDLET TO ACCESS XML-WEBSERVICE using KSOAP

yesterday(19.2.2012)  I did a simple  example for consuming
webservice in midlet using  ksoap.

  ksoap made consuming webservice as an easiest  thing.
I  wanted ksoap1  jar I googled as  "ksoap  for  j2me"
then I got   "ksoap2.sourceforge.net/"
from this page I found  the line

" kSOAP1 is deprecated and archived at ksoap.objectweb.org
 (thanks to the objectweb.org team for keeping the kSOAP 1 pages
 after the merger with enhydra.org)."

Then I went to 'download  section' on that page itself.

There I found this link

  http://ksoap.objectweb.org/software/downloads/

where  I got the  ksoap-midp.zip

   just  paste that zip  file  in  c:\wtk104\apps\srm\lib.  (here srm is my application's name)

In midlet  code 3 lines are most  important to webservice,

 That  is,

     SoapObject  ob=new  SoapObject("","sayhello");

     ob.addProperty("a",s1);
   
     HttpTransport   transport=new    HttpTransport(url,"");

  here  'sayhello'  is  the function name and 'a'
is  parameter  name.

  To use these 2 classes  (SoapObject  and  HttpTransport) we need to import  ksoap  package.

import  org.ksoap.*;
import  org.ksoap.transport.*;


  Then my webservice  application  got run successfully!

 I have given detailed code in my  website.

Saturday 18 February 2012

WORKING IN ECLIPSE IDE

WORKING IN ECLIPSE IDE
======================
    So far , I did all my work in command prompt ( shell). I find it easier to do and understand.
   But, I am told by my friends and seniors that it is absolutely necessary to know how to use Eclipse, in any software company job.
  
    So, I began my experiments with Eclipse a few days back. There are many names by which Eclipse is known, such as Indigo, Europa, Ganymede, Helios ,Galileo, Calisto etc. I got confused. I made a google search for ‘eclipse versions and code names’.   Wikipedia gives the following information.   I think , this may be useful to students like me.

      Calisto              June 2006            3.2

      Europa             June 2007            3.3

      Ganymede       June 2008            3.4

      Galileo              June 2009           3.5

      Helios               June 2010           3.6

      Indigo               June 2011           3.7
      

    As I found many references in articles to Ganymede, I downloaded  that software by typting
Eclipse Ganymede Software  in  Google 
 I got the site as

     There are two versions.

a)           Eclipse IDE for Java Developers
b)           Eclipse IDE for JEE  Developers.

As my work is mostly in J2EE, I downloaded the EE version. It took about 30 minutes.
=============================================
The latest version however is Indigo ( 3.7).
So, I will illustrate with Indigo.
Indigo also is about 200 mb .


RUNNING    A SIMPLE   CONSOLE  PROGRAM
 IN
ECLIPSE (INDIGO) 

Initially  You  will get a  welcome  screen. Close  It.

choose   file ->new

we choose ‘other’ and click

we get a lot of options.

I chose ‘java project’ directly .
and clicked ‘next’


Then, I chose ‘class’

Then I got a  dialog  box asking ‘package name’, ‘class name’, etc . For this project  I didn’t used   package. so I gave  the  ‘class name’  only as 'demo'.
There  is  a question  “which method  stubs  would  you  like  to  create”

I chose  the  first option (ie)
 ‘public  static void main(String[]  args)’
then  I  clicked ‘finish’. So that  I got  the following  page (in which I found  automatically  created  demo class  with  main method)
Then  I  included my  code.
Then I  saved  that  program

Then  I  right clicked over  that  program. So that  I  got  the list
Then  I chose ‘Run  as’  from  the  List
So  I got  another  List, From that list  I selected  “java  Application”
The  program  got  run and  I  got  the result in console  screen.
( if we close the two windows in the right side of the screen,
we get just three windows.
One in left, another in top right and the third in bottom right.

The left window is the project explorer.
The top-right is edit window.
The bottom-right is the output window ( console).
When we run the program, we get ‘hello’ in the output window ( console).
Actually, console is better name than ‘output window’ because, we can give input in that window.
 --------------------------------------------

   HOW   TO RUN A SERVLET
(USING PACKAGE AND HELPER CLASS

I   AM USING  ECLIPSE   GANEYMEDE  J2EE  VERSION

I  HAVE   CONNECTED  TO  TOMCAT5.

File->new->Dynamic web project
Give name as rms. ( my name)
Then  Right  Click on your  project  name which is in top  left of the screen. Then You will get the list. I chose ‘package’.
2.           so, I got  the dialog.
    give  name  to that   package.
3. Then  creating  a  hellobean.java   in  mypack
i.             right  click  on the “mypack”  package
ii.        go  to  new->class
Then  type  your  hellobean  class  code.

4. Then  create  the helloservlet  in  mypack .

5. Then   give   name to  helloservlet

6. Then  type  the  helloservlet.java  code

7. Then  create  the helloservlet.htm    file

   i.             right  click  on  your  project  folder and  choose  items 

  8. then  give name  to  html   file

9.Type  the  html   code

10.                    then  save  all your  files  and  then  run  the  html  file  
                   
     i .  right  click  on  the above html file and choose  Run asàRun On Server

You  will get the input  page. Give  input and click the ‘submit’  button.
Then  you  will get the following output.


In the coming lessons, I will show how I ran the other types of programs like AWT Frame, Swing, TCP client-server, UDP client-server, RMI, RMI-IIOP, IDL, JSP, Hibernate console & frame,
Struts1.1 , etc.

I  have given  the  full lesson with  screen shots in  my website